Journal of
eISSN: 2574-8114


Research Article Volume 12 Issue 2
 Md Rafin Mia, Soborna Akter
Department of Fashion Design & Technology (FDT), Sonargaon University (SU), Bangladesh
Correspondence: Md Ahshan Habib, Department of Fashion Design & Technology (FDT), Sonargaon University (SU), Dhaka, Bangladesh
Received: March 20, 2026 | Published: March 31, 2026
Citation: Habib A, Mia R, Akter S. Developing aesthetic shade and surface effects using urea in acid dye printing on silk fabrics. J Textile Eng Fashion Technol. 2026;12(2):92-102. DOI: 10.15406/jteft.2026.12.00455
This study investigates the role of urea in generating controlled shade variation and diffusion effects on silk fabric printed with acid dyes. An experimental approach was employed using three surface design techniques block printing, screen printing, and hand painting combined with three treatment conditions: conventional application, urea spreading, and urea spraying. After a controlled dwell time, all samples were subjected to steam fixation to evaluate dye fiber interaction and final visual outcomes. The results demonstrate that urea significantly influences dye diffusion behavior, motif clarity, and shade depth. The spreading method produced comparatively darker shades and stronger localized diffusion due to higher urea concentration, while the spraying method generated softer, more uniform tonal transitions with lighter visual effects. Differences among the applied techniques further revealed how process-specific characteristics interact with urea treatment to shape aesthetic outcomes. The findings highlight the potential of urea as both a functional auxiliary and a creative design tool for controlled shade gradation and surface texture development in silk textile printing. This study contributes to contemporary textile design research by integrating chemical intervention with experimental surface design to expand aesthetic possibilities.
Keyword: silk, acid dyes, urea, block printing, screen printing, hand painting, dye diffusion, shade variation, surface effects, textile design
Silk is a natural protein fiber primarily produced by the silkworm Bombyx mori and is well known for its exceptional mechanical and aesthetic properties. Structurally, silk consists of two main proteins fibroin, which forms the core structural filament, and sericin, a gummy protein that surrounds fibroin and binds the filaments together.1 Fibroin contains repetitive glycine–alanine amino acid sequences that promote the formation of highly ordered β-sheet crystalline regions embedded within an amorphous matrix. This semi-crystalline hierarchical structure is responsible for silk’s remarkable tensile strength, elasticity, and toughness.2 Mechanical studies report that Bombyx mori silk fibers exhibit tensile strengths ranging from approximately 250–500 MPa and a Young’s modulus of about 9–15 GPa, depending on processing conditions.3 The alignment and proportion of β-sheet structures significantly influence these mechanical properties. In addition to strength, silk possesses excellent moisture absorbency due to the presence of polar peptide groups, contributing to wearer comfort. Furthermore, silk demonstrates biodegradability and biocompatibility, making it valuable not only in textiles but also in biomedical and advanced material applications.4
Dyeing behavior of acid dyes on silk
Acid dyes are water-soluble anionic colorants widely used for dyeing protein fibers such as silk due to their strong attraction between dye and fiber and compatibility with the fiber’s chemical structure. These dyes typically contain sulfonic (–SO₃H) or carboxylic (–COOH) acid groups, which become negatively charged in aqueous acidic media. Silk fibroin contains amino (–NH₂) groups that, under acidic dye bath conditions (pH 2–5), become protonated (–NH₃⁺), generating positively charged sites along the polymer chain. The primary mechanism of dye fixation therefore occurs through electrostatic (ionic) attraction between the anionic dye molecules and the cationic sites on silk.5 In addition to ionic bonding, hydrogen bonding and van der Waals forces further stabilize the dye-fiber interaction. Adsorption studies have demonstrated that acid dye uptake on silk often follows Langmuir-type isotherm behavior, indicating saturation of available binding sites.6 Although acid dyes generally provide bright shades and good dye uptake on silk, wash fastness depends on the strength of ionic interactions, which are weaker than covalent bonds. Recent research explores modified reactive acid dye systems to improve fixation and fastness performance on silk substrates.7
Research contextExperimental surface design in contemporary textile practice
Experimental surface design in contemporary textile practice explores innovative methods that enhance the visual, tactile, and structural qualities of fabrics beyond traditional techniques. It integrates craftsmanship, material science, and design experimentation. Techniques such as printing, resist dyeing, pleating, embossing, and layered applications enable designers to create texture, depth, and dynamic surface effects in textiles.8 Recent studies highlight how experimental surface techniques extend beyond aesthetic enhancement to incorporate responsive and interactive properties. For example, research in interactive fashion and textile design demonstrates how combining traditional textile processes with environmentally sensitive or reactive materials can produce adaptive and transformative surface effects.9 Additionally, investigations into three-dimensional textile manipulation techniques, such as Shibori, reveal how controlled structural distortion and compression can produce complex surface textures and tonal variations, contributing to contemporary design innovation.10
Further research emphasizes that surface modification processes significantly influence textile performance characteristics, including durability, flexibility, and functional behavior.11 Therefore, experimental surface design not only expands creative expression but also enhances material functionality. Contemporary textile practice increasingly values such experimentation as a bridge between artistic exploration and scientific understanding, enabling designers to develop unique surface identities while maintaining structural and performance integrity.
Role of urea in textile printing
Urea is a widely used auxiliary chemical in textile printing that influences dye solubility, moisture retention, and dye fiber interaction, especially in acid and reactive dye systems. It acts as a dye solubilizing agent and disaggregating agent, improving the dissolution and stability of dye particles in the printing paste. This enhanced solubility helps maintain a uniform dye dispersion, promoting better penetration and even distribution of dye molecules on the textile surface during the fixation process.12 Another key function of urea is its hygroscopic property, meaning it helps retain moisture in the printing paste and on the fabric surface during drying and subsequent steaming. This moisture retention slows down premature drying, allowing dye molecules more time to migrate into fiber structures and interact effectively with reactive or acid dye sites. It also promotes fiber swelling, which can increase dye penetration and bonding during the fixation stage.13 urea has also been described as a pH buffer and a moisture-regulating agent that can influence the overall print quality and color produce. Although urea use has environmental drawbacks, such as high nitrogen content in waste, it remains a traditional component in many textile printing formulations because of its effectiveness in improving color strength, fixation, and dye diffusion during steaming or curing.14
Conventional acid dyeing on silk primarily aims to produce uniform shades, which limits opportunities for creative diffusion effects. Although urea is widely used in textile printing for its solubility-enhancing and moisture-retention properties, its role in controlled shade variation remains underexplored. This study investigates how different urea application methods can produce reproducible shade variations and surface effects on silk fabric.
Aim of the studyThis study investigates the influence of urea application methods on shade variation and surface effects in acid-dyed silk using block printing, screen printing, and hand painting techniques, with particular focus on dye diffusion, tonal depth, and aesthetic outcomes after steam fixation.
Research questions1) To develop shade variations and surface effects in acid-dyed silk fabric.
2) To apply acid dyes on silk using three surface design techniques.
3) To document a systematic process for creative shade development on silk.
Scope of the studyThis study explores urea-induced shade variation on 100% silk fabric using acid dyes through block printing, screen printing, and hand painting techniques. It evaluates spreading and spraying methods, focusing on visual effects, color depth, and reproducibility.
Silk is a natural protein fiber composed mainly of fibroin and sericin. Fibroin forms about 70–80% of the fiber and provides structural strength, while sericin makes up 20–30%, acting as a gummy binding substance that holds fibroin filaments together in the cocoon, giving silk its unique physical and chemical properties.15,16 At the molecular level, silk fibroin contains heavy and light chains linked by disulfide bonds and amino acids such as glycine, alanine, and serine. These form crystalline β-sheet and amorphous regions, providing strength, flexibility, and influencing the fiber’s interaction with dyes and chemicals.15 Silk’s dye affinity depends on functional groups such as amine (–NH₂), carboxyl (–COOH), and hydroxyl (–OH). In acidic conditions, amino groups become protonated (–NH₃⁺), creating positive sites that attract anionic acid dye molecules through ionic bonding, enabling strong dye uptake and good dye exhaustion.17 Moreover, studies on dye diffusion into fibroin fibers show that dyeing involves adsorption at the fiber surface followed by diffusion into the fiber interior, which is governed by the molecular structure and available binding sites on the fiber. Controlling factors such as pH, temperature, and molecular size of dye affects the interaction dynamics and shade depth on silk substrates.18
Chemistry of acid dyesAcid dyes are water-soluble, anionic synthetic dyes widely used for dyeing protein fibers such as wool, silk, and nylon under acidic conditions. They typically contain sulfonic (–SO₃Na) or carboxylic (–COOH) groups, which provide solubility and anionic character. These negatively charged groups enable strong electrostatic interaction with positively charged sites on protein fibers.19,20 Acid dyes have large aromatic parts like azo, anthraquinone, and triphenylmethane that give bright colors. Sulfonic groups help them dissolve in water and keep a negative charge, allowing them to bind well with positively charged sites on protein fibers during dyeing.20 Acid dyes mainly bond to protein fibers through ionic attraction between negatively charged dye ions and positively charged amine groups (–NH₃⁺) on silk. In acidic conditions, these positive sites form and attract the dye. Hydrogen bonding and van der Waals forces also help stabilize the dye fiber interaction.19,21 Acid dyes are classified as leveling, milling, or neutral types based on their molecular size and properties. Bath pH affects dye uptake; lower pH increases fiber protonation and dye affinity, while higher pH reduces attraction and shade uniformity.20
Factors affecting acid dyeing on silk
The efficiency of acid dyeing on silk is governed by several interrelated parameters, including temperature, time, dye concentration, and fiber structure. Temperature significantly affects dye uptake by enhancing molecular mobility and fiber swelling, which facilitates dye diffusion into the silk matrix. Studies show that increasing temperature improves color strength (K/S value), although excessive heat may lead to dye aggregation or fiber damage.22,23 Time is another critical factor influencing dyeing performance. Research indicates that increasing dyeing time enhances dye adsorption and absorption until equilibrium is reached, beyond which no significant improvement in color yield occurs. For silk, optimal dyeing time has been observed within specific ranges depending on dye type and conditions.24 Dye concentration directly controls shade depth and color intensity. Higher dye concentrations increase the availability of dye molecules, resulting in deeper shades; however, excessive concentration may cause molecular aggregation, reducing effective diffusion and leading to uneven coloration.22,25
Fiber structure also plays a vital role in dye affinity. Silk fibroin contains functional groups such as amino and carboxyl groups, which facilitate ionic interactions with anionic acid dyes. The semi-crystalline structure of silk, composed of crystalline β-sheet regions and amorphous domains, governs dye penetration, with amorphous regions allowing easier diffusion.25 Additionally, pH conditions in the dye bath influence dye-fiber interaction, as acidic conditions enhance protonation of amino groups and increase dye uptake.25
Surface design techniquesSurface design techniques like block printing, screen printing, and hand painting improve fabric appearance and design variety, especially on silk. Block printing is an old method where carved wooden blocks are used to apply dye onto fabric. Each print may vary slightly due to hand application, giving a unique handmade look. It is still widely used and valued, especially in South Asian textile traditions.26,27 Screen printing uses a mesh screen with a stencil to transfer dye onto fabric. It allows clear, precise, and repeatable designs with good control over color and layering. Screens can be made manually or with photo-emulsion for detailed patterns. It is suitable for both small artistic work and large-scale production because it keeps designs consistent.28
Hand painting is a textile design method where colors are applied directly to fabric using brushes or other tools. It creates unique, non-repeating designs and allows full artistic freedom, especially on silk. Traditional styles like Kalamkari show its cultural value and detailed craftsmanship. Today, hand painting is still used in fashion to combine traditional art with modern design.29,30 These surface design techniques together enhance textile expression. Block printing offers traditional, handcrafted quality; screen printing allows precise, multi-color patterns; and hand painting provides artistic freedom. Designers often combine these methods to influence dye diffusion, enrich surface aesthetics, and, through contemporary research, blend traditional practices with innovative materials and technologies, expanding creative potential while preserving cultural heritage.26
Steam fixation in acid dyeingSteam fixation is used to permanently set acid dyes on silk and other protein fibers. The heat and moisture help dye molecules move deeper into the fiber and improve bonding. It also increases fiber swelling, leading to better color absorption, even shade, and improved color fastness.31
Pad-steam dyeing uses steam to improve dye fixation and evenness. The moisture helps dye bond well with the fiber and reduces unfixed dye on the surface. This results in better color uniformity and improved wash and light fastness.32 In steam fixation, moisture helps dye molecules move into the fiber. The warm, wet conditions improve dye migration and bonding with the fiber. This leads to better fixation, deeper color, and improved durability in acid-dyed silk.31
Shade development and dye diffusion theoriesShade development in textile dyeing depends on how dye molecules move and interact with fibers. The process includes moving dye to the fiber surface, adsorption, and diffusion into the fiber. Diffusion controls how deeply the dye penetrates, affecting shade depth and uniformity.33 Studies on acid dyeing of silk show that dye uptake depends on how dye molecules move in the dye bath. Flow conditions and movement affect how dye reaches and enters the fiber. This influences shade development. Understanding adsorption and diffusion helps control dye absorption more effectively.34 Mathematical models describe dyeing as a multi-step process of diffusion into fibers. These models explain how dye moves from the surface into the fiber interior. Factors like temperature, dye size, and fiber structure affect diffusion speed and shade depth.18 Diffusion theories explain shade development as a balance between dye adsorption on the surface and movement into the fiber. This helps provide a scientific basis for controlling shade in textile dyeing.
Research gapAlthough acid dyeing of silk and the role of urea in textile printing are well known, little research has focused on how urea can create different shades using block printing, screen printing, and hand painting. In particular, the effects of where urea is applied, how long it stays on the fabric, and steam fixation are not well studied. This creates a gap in understanding how urea can be used to control shade variation and surface effects in silk dyeing.
This study uses an experimental design to examine urea-induced shade variation on acid-dyed silk. Laboratory methods include block printing, screen printing, and hand painting, followed by urea application through spreading and spraying. After a set contact time and steam fixation, shade development is evaluated by comparing color intensity and surface effects.
Materials and equipment
The materials and equipment used in this study for urea-induced shade variation on acid-dyed silk through block printing, screen printing, and hand painting are listed in Table 1 below:
|
Sl. No. |
Material/Equipment |
Purpose |
|
1 |
Silk fabric |
Base substrate for dyeing |
|
2 |
Acid dyes |
Coloration of silk fabric |
|
3 |
Urea |
Shade variation and surface effect development |
|
4 |
Acetic acid |
Acidification of dye bath |
|
5 |
Thickener (A.G.B. and babul gum) |
Preparation of printing paste |
|
6 |
Wooden block |
Block printing technique |
|
7 |
Screen frame |
Screen printing technique |
|
8 |
Squeegee |
Application of printing paste through screen |
|
9 |
Paint brushes |
Hand painting application |
|
10 |
Spray bottle |
Urea spraying method |
|
11 |
Measuring cylinder |
Accurate measurement of liquids |
|
12 |
Digital weighing scale |
Precise weighing of dyes and chemicals |
|
13 |
Steamer |
Steam fixation process |
|
14 |
Dryer |
Drying/heat treatment |
|
15 |
Protective gear |
Laboratory safety |
Table 1 Materials and equipment used for block printing, screen printing, and hand painting
The design development process involves converting initial ideas into textile motifs for surface application. It begins with concept research and inspiration gathering, followed by sketching and refinement of selected motifs. The finalized design is then adapted for block printing, screen printing, and hand painting to ensure appropriate pattern placement and visual effectiveness on silk fabric.
The Figure 1 illustrates the sequential process of block printing design development, beginning with concept generation and design refinement, followed by color separation for multi-color printing. The finalized design is then transferred in mirrored form onto a wooden block, which is carefully carved to create the printing surface. Finally, the carved block is prepared and tested, making it ready for the printing process.
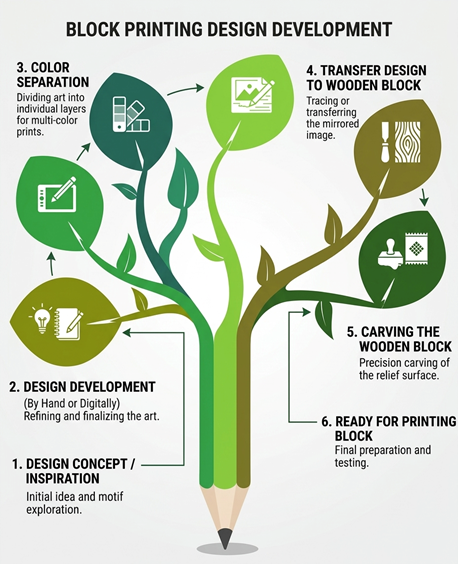
Figure 1 Block printing design development process.
The Figure 2 presents the screen printing design development process, starting with concept creation and digital design refinement, followed by color separation into individual layers. These separated layers are then printed onto tracing paper or film positive, while the screen is prepared by coating the mesh with photo-emulsion. The mesh number is important in screen printing as it directly influences the resolution and paste transfer. In this study, a 16T metric mesh fabric was used to achieve appropriate color deposition and design clarity. Finally, the design is transferred onto the screen frame through exposure and washing, after which the screen is ready for printing.
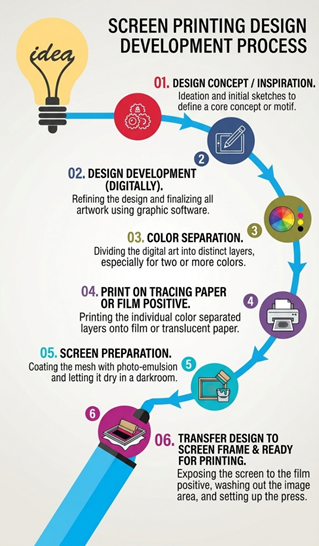
Figure 2 Screen printing design development process.
|
Acid dye paste recipe for screen printing (for 1 Liter) |
||
|
Component |
Quantity |
Remarks |
|
Acetic Acid |
20 ml |
|
|
Glycerin |
20 ml |
|
|
Dye |
40 gm |
Higher dye concentration results in increased color depth and darker shades |
|
A.G.B (Thickener) |
500 gm |
A pre-prepared gum solution was used for printing paste preparation. |
|
Water |
420 gm |
|
Table 2 Acid dye paste recipe for screen printing (for 1 Liter)
Paste preparation: In the paste preparation process, water was first boiled, and the acid dye was added according to the required formulation. The mixture was stirred thoroughly until the dye was completely dissolved. After that, acetic acid, glycerin, A.G.B. (alginate gum base), and additional water were added as specified. The mixture was then stirred continuously to ensure all components were well combined, resulting in a smooth and uniform printing paste suitable for application.
|
Acid dye paste recipe for block printing (for 1 Liter) |
||
|
Component |
Quantity |
Remarks |
|
Acetic Acid |
20 ml |
|
|
Glycerin |
20 ml |
|
|
Dye |
40 gm |
Higher dye concentration results in increased color depth and darker shades |
|
Babul Gum (Thickener) |
250 gm |
Hard thickener should be used in minimal quantity. |
|
Water |
670 gm |
|
Table 3 Acid dye paste recipe for block printing (for 1 Liter)
Paste preparation: First, water was boiled and acid dye was added according to the required recipe. The mixture was stirred thoroughly until the dye completely dissolved. Acetic acid, glycerin, babul gum, and additional water were then added according to the formulation. Continuous stirring was carried out until a smooth and homogeneous printing paste was obtained.
|
Acid dye water color recipe for hand painting |
|
|
Component |
Quantity |
|
Acetic Acid |
Use moderately |
|
Dye |
Use moderately |
|
Water |
Use moderately |
Table 4 Acid dye water color recipe for hand painting
Color preparation: Water was boiled and a measured amount of acid dye was added. The mixture was stirred thoroughly until the dye completely dissolved. A moderate amount of acetic acid and additional water were then added. The solution was continuously stirred until a uniform dye solution was obtained.
Experimental proceduresBlock printing process: In the block printing process, the silk fabric was first placed on the printing table and secured with paper pins to prevent any movement during printing. The prepared printing paste was then spread evenly on the color pad to ensure proper pickup. A carved wooden block containing the design was pressed onto the color pad so that the paste was distributed uniformly on its surface. The block was then carefully pressed onto the fabric with consistent pressure to transfer the motif clearly. For this experiment, two color blocks and one line design block were used, resulting in a complete three block printed design.
Figure 3 demonstrate the step by step Block Printing Process where Step 1: Designed wooden blocks prepared for printing. Step 2: Silk fabric securely fixed onto the block printing table using paper pins. Step 3: Printing paste evenly spread on the color pad. Step 4: Blocks applied with consistent pressure to transfer motifs. Step 5: Two blocks used for one design. Step 6: Total three blocks used.
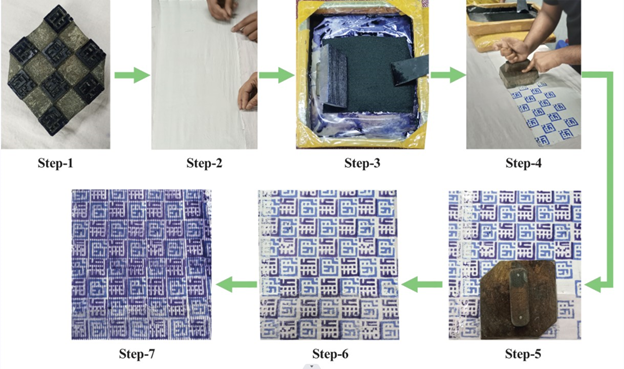
Figure 3 Demonstration of block printing process.
Block printing workflow:
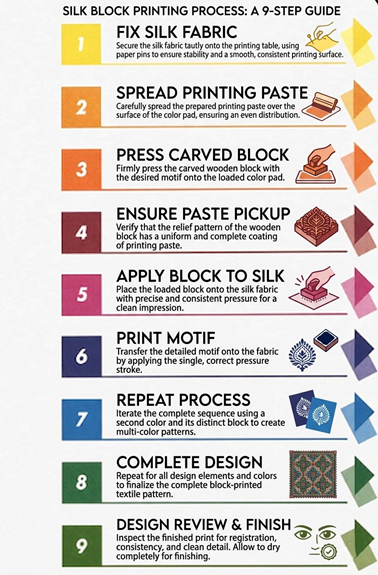
Figure 4 Block printing process info graphic.
Screen printing process: In the screen printing process, the silk fabric was first positioned and firmly secured on the screen printing table (wax table) using a small wooden tool to ensure a smooth and stable surface. The prepared screen frame containing the design was then placed accurately over the fabric. In this experiment, a two-color design was used. The acid dye printing paste, prepared according to the formulation, was poured onto the screen. Using a squeegee, the paste was pulled evenly across the screen from top to bottom to transfer the design onto the fabric. This process was repeated twice to ensure proper color transfer. The number of squeegee passes is critical. A single pass may result in incomplete design transfer, whereas multiple passes ensure proper paste penetration and uniform print quality. Finally, the printed fabric was dried using a dryer. Figure 5 shows the Screen Printing Process, Step 1: Screen frame fully prepared for printing. Step 2: Silk fabric positioned and securely fixed on the screen printing (wax) table using a wooden tool. Step 3: Prepared screen frame accurately placed over the fabric. Step 4: Printing paste pulled evenly with a squeegee to transfer the design. Step 5: Printed result obtained. Step 6: Fabric dried using a dryer.
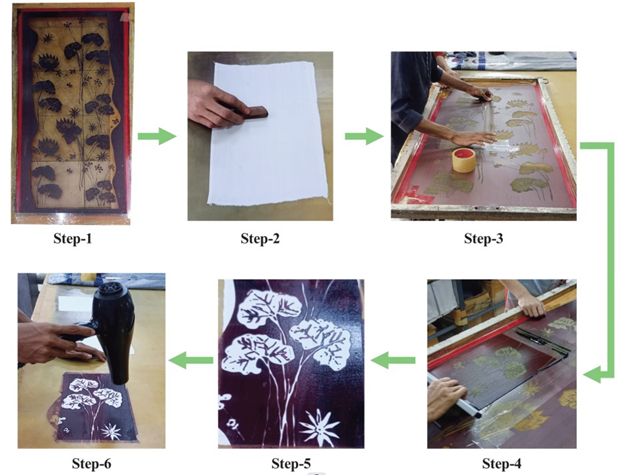
Figure 5 Screen printing process.
Screen printing workflow:
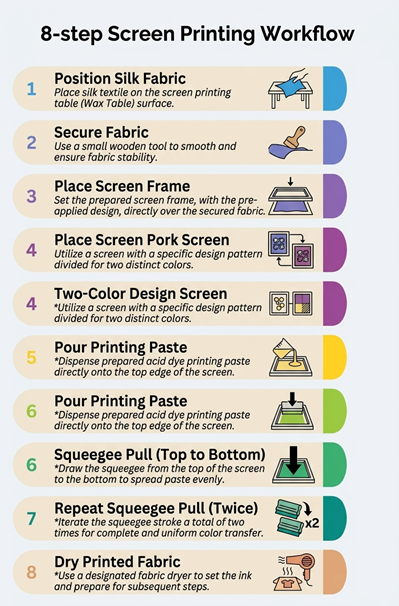
Figure 6 Screen printing workflow.
Hand painting process: In the hand-painting process, the silk fabric was first placed on a wax table and firmly secured by rubbing it with a small wooden tool to ensure a smooth and stable surface. The fabric was then painted directly using acid dye watercolor prepared according to the formulation, applied with a painting brush. Figure 7: Sample -1 Depicts the Hand Painting Process the silk fabric was directly painted using acid dye applied with a painting brush, allowing controlled color application and artistic surface development.
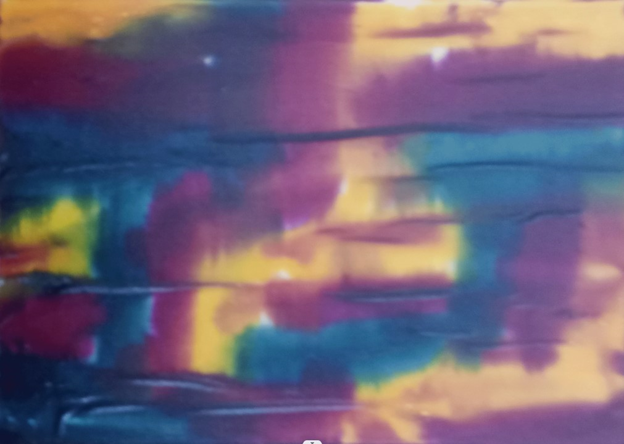
Figure 7 Hand painting process sample-1.
In the second sample, the design was first created digitally on a computer and then printed onto tracing paper. The printed design was carefully perforated along the motif lines using a paper pin to create small holes. The perforated tracing paper was placed on the silk fabric, and the design was transferred using an indigo solution prepared from indigo and kerosene. This process created a visible outline on the fabric. After the design was transferred, the motif was completed by painting with the prepared acid dye solution using a brush, ensuring accurate and controlled color application. Figure 8: Sample-2 depicts the Hand Painting Process, Step 1: Design developed digitally using Adobe Illustrator. Step 2: Design printed onto tracing paper and perforated along motif lines using a paper pin. Step 3: Perforated design positioned for transfer onto fabric. Step 4: Motif painted manually using watercolor with a brush. Step 5: Completed hand-painted motif.
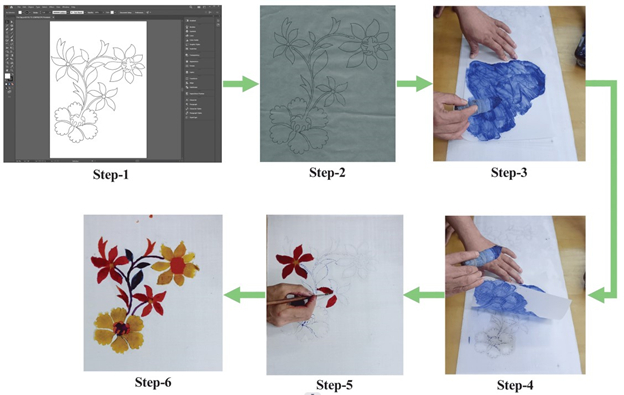
Figure 8 Hand painting process sample -2.
Sample 1: Direct Hand Painting Sample 2: Tracing Method Hand Painting
Hand painting procedure: Figure 9 depicts the info graphic where Sample1: Direct Hand Painting, Sample2: Tracing Method Hand Painting.
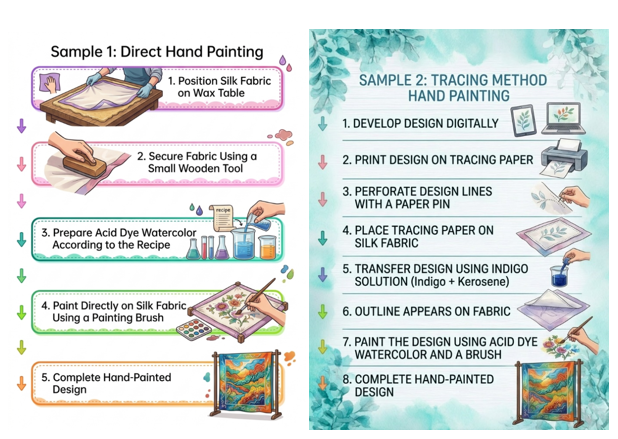
Figure 9 Hand painting procedure for sample 1 and 2.
Spreading method
Block printing: After printing on the block printing table, the fabric was allowed to dry slightly before being removed and placed on a wax table. The fabric was transferred because the block printing table is typically made of jute and cloth, which absorb moisture from the printing paste and cause the design to dry, reducing the effectiveness of urea. Once placed on the wax table, urea was spread unevenly over the fabric surface as desired. Normal water was then sprayed onto the fabric. This spraying process was repeated two to three times, and the fabric was left undisturbed for approximately 3.5 hours. Figure 10 show the result of after block printing, urea was unevenly spread over the fabric surface as desired, followed by spraying of normal water to facilitate dye diffusion and surface effect development.
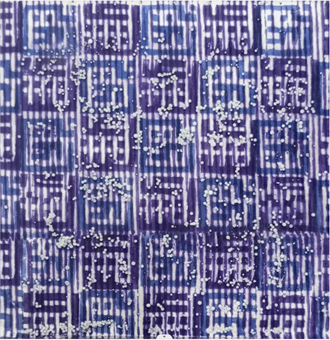
Figure 10 Block printing urea application -spreading method.
Screen printing: After printing on the fabric placed on the screen printing table, the print was allowed to dry slightly. Urea was then spread over the fabric surface as desired. Afterward, normal water was sprayed onto the fabric. This spraying process was repeated two to three times, and the fabric was left undisturbed for approximately 3.5 hours. Figure 11 depicts After screen printing, urea was spread over the fabric surface as desired, followed by spraying of normal water to promote dye diffusion and enhance surface effects.
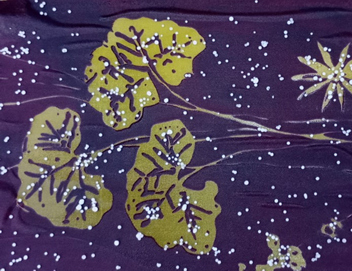
Figure 11 Urea spreading method applied to screen-printed silk showing post-print diffusion development.
Hand painting: After painting on the fabric placed on the wax table, the paint was allowed to dry slightly. Urea was then spread over the fabric surface as desired. Afterward, normal water was sprayed onto the fabric. This spraying process was repeated two to three times, and the fabric was left undisturbed for approximately 3.5 hours. Figure 12 depicts After hand painting, urea was spread over the fabric surface as desired to influence dye diffusion and create varied surface effects.
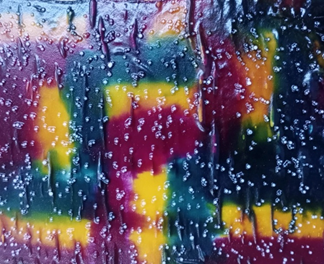
Figure 12 Hand painting spreading method.
Spraying method
Block printing: The fabric was first positioned and secured on the wax table to ensure a stable surface. A prepared solution of urea and water (250 g water to 25 g urea) was then sprayed evenly over the printed or painted design. The spraying process was repeated two to three times to allow adequate moisture interaction with the surface. After application, the fabric was left undisturbed for approximately 3.5 hours to allow the urea solution to interact with the dye and develop the desired surface effects. Figure 13 depicts A prepared solution of urea and water was then sprayed evenly over the printed design.
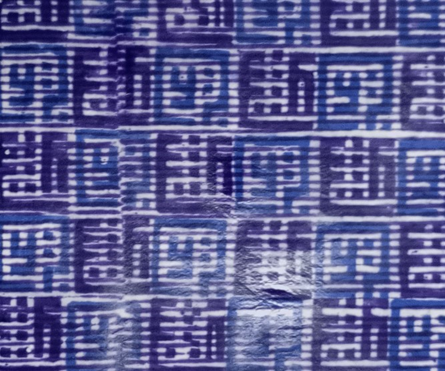
Figure 13 Block printing spraying method.
Screen printing: After printing, the fabric placed on the table was lightly sprinkled with urea. A prepared urea–water solution was then sprayed evenly over the surface. The treated fabric was left undisturbed for approximately 3.5 hours to allow proper interaction between the urea, moisture, and dye on the fabric surface. Figure 14 demonstrates A small amount of urea was spread on the printed surface, followed by even spraying of a prepared urea–water solution to enhance dye diffusion and surface variation effects.
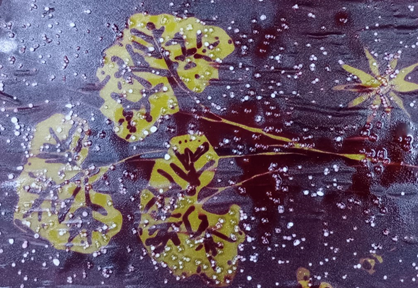
Figure 14 Screen printing spraying method.
Hand painting: After completing the painting, the fabric, secured on the table, was evenly sprayed with a urea–water solution. The treated fabric was then left undisturbed for approximately 3.5 hours, allowing the urea to interact with the dye and develop the intended shade variation and surface effects. Figure 15 demonstrates A small amount of urea was first spread on the printed surface, followed by even spraying of a prepared urea–water solution to promote controlled dye diffusion and develop surface effects.
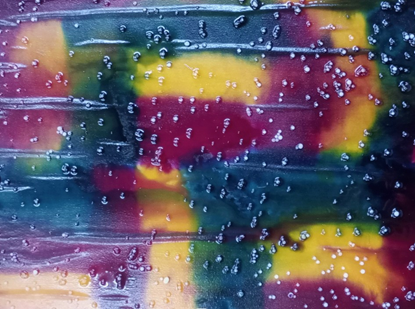
Figure 15 Hand painting spraying method.
Steam fixation was performed to permanently set acid dyes on the silk fabric after printing and urea treatment. The samples were placed in a steam chamber where heat and moisture promoted dye penetration and fixation within the fiber. After steaming, Fabric goes for Washing. Figure 16 shows the steaming setup consists of a steamer (depicted in blue on the left) connected to a round steam chamber (shown on the right), where saturated steam facilitates dye penetration and fixation on the fabric. The colors become clearer and more vibrant after steam fixation, as the dye properly bonds with the fiber (Table 5).
|
Steam time–temperature–pressure settings |
|
|
Parameter |
Setting |
|
Steam Temperature |
90-100 °C |
|
Steaming Time |
180 minutes |
|
Steam Pressure |
Atmospheric Pressure |
Table 5 Steam parameters
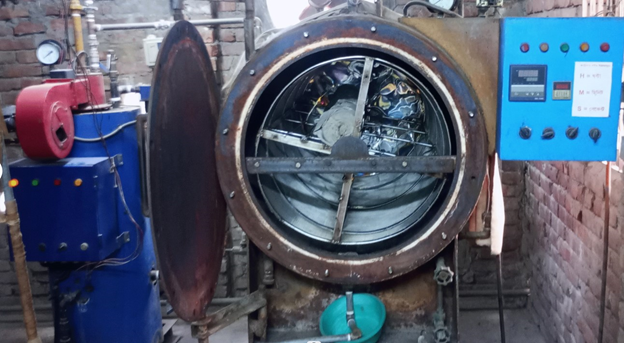
Figure 16 Steaming mechanic.
After steaming, the fabric was washed in cold water containing Lisapol to remove unfixed dye and impurities. (Lisapol and Water ratio - 100 gm/50 liter)
Subsequently, the fabric was immersed in an acetic acid solution for approximately five minutes with gentle stirring. Finally, the samples dried at room temperature. (Acetic Acid and Water ratio 10 gm/ 20 liter).
A total of more than twelve samples were prepared to investigate shade variation on silk fabric. Three surface design techniques block printing, screen printing, and hand painting were employed. For each technique, three variations were applied: conventional printing, urea spreading, and urea spraying methods. This experimental setup allowed systematic comparison of shade development, dye diffusion, and surface effects across different conditions. Figure 17 the visual results of the experimental samples before and after urea application and steam fixation:
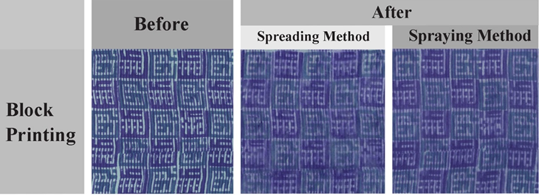
Figure 17 Block printing before after visual results.
Block printing: Before treatment, the motifs appeared clear and well defined. After the spreading method, the design produced a foggy, blurred effect. In contrast, the spraying method generated a softer and more visually appealing blurry diffusion.
Screen printing: The screen-printed samples showed clear and well-defined motifs before urea treatment. After applying the spreading method, the design developed a foggy blurred appearance with visible white dot effects. In contrast, the spraying method produced a smoother and more uniform foggy diffusion, creating a softer visual transition around the printed motifs. Figure 18 shows the Screen Printing before after visual results
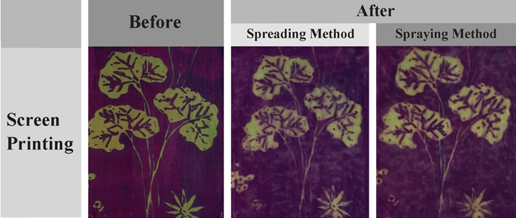
Figure 18 Screen printing before after visual results.
Hand Painting: Sample 1: In the hand-painted samples, the color schemes appeared clear and well defined before urea treatment. After applying the spreading method, white dot effects and slight color edge blending were observed. In contrast, the spraying method allowed the colors to blend smoothly, producing new aesthetic variations and softer tonal transitions. Figure 19: Sample -1 shows the Hand Painting before after visual results.
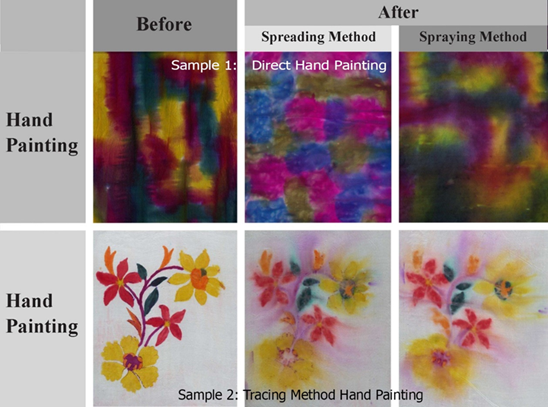
Figure 19 Hand Painting before after visual results.
Hand Painting: Sample 2: The motif appeared visually clear before urea treatment. After applying the spreading method, the motif color dispersed smoothly across the fabric, creating a noticeable color diffusion effect. In contrast, the spraying method produced a softer and more controlled dispersion, resulting in a subtle and sober visual effect.
Figure 20: Sample -2 shows the Hand Painting before after visual results.
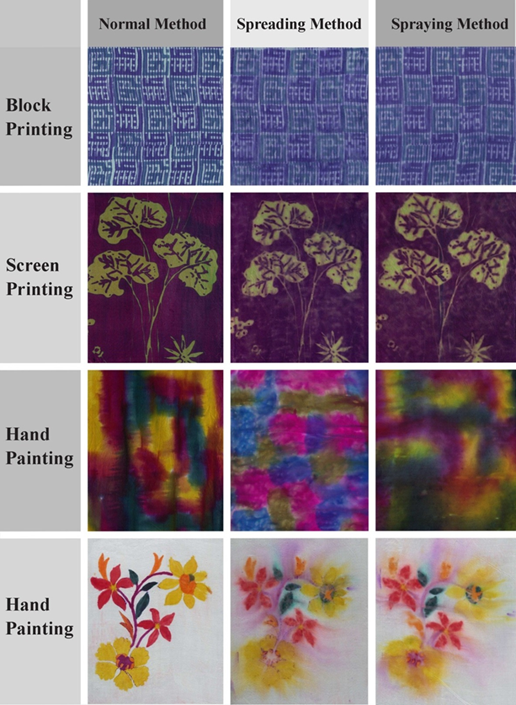
Figure 20 Technique-wise comparison of printing methods and urea effects.
Technique-wise comparison:
(Table 6) (Table 7)
|
Technique-wise comparison of printing methods and urea effects |
||||
|
Technique |
Before treatment |
After spreading method |
After spraying method |
Overall visual effect |
|
Block Printing |
Motifs were clear and well defined. |
Produced a foggy and blurred effect around the motifs. |
Created a softer and visually appealing blurry diffusion. |
Strong diffusion effect with artistic blur. |
|
Screen Printing |
Motifs appeared clear, sharp, and precise. |
Developed a foggy blur with noticeable white dot effects. |
Produced a smoother and more uniform foggy diffusion. |
Balanced diffusion while maintaining motif clarity. |
|
Hand Painting Sample 1 |
Color schemes were clear and well defined. |
White dot effects and slight color edge blending appeared. |
Colors blended smoothly, producing aesthetic tonal variations. |
Artistic blending and natural color transitions. |
|
Hand Painting Sample 2 |
Motif was visually clear. |
Motif color dispersed smoothly across the fabric. |
Produced softer and more controlled dispersion. |
Subtle and sober diffusion with gentle color spread. |
Table 6 Technique-wise comparison of printing methods and urea effects
|
Shade depth comparison of urea application methods |
|||
|
Technique |
Before treatment |
After spreading method |
After spreading method |
|
Block Printing |
Normal shade intensity with clear motif edges. |
Slightly darker shade with stronger color concentration. |
Slightly lighter shade with soft diffusion. |
|
Screen Printing |
Balanced shade with sharp motif visibility. |
Slightly darker shade with foggy blur effect. |
Slightly lighter shade with smoother diffusion. |
|
Hand Painting |
Original color tone with clear color boundaries. |
Slightly darker shade with noticeable dispersion effects. |
Slightly lighter shade with smoother color blending. |
Table 7 Shade depth comparison of urea application methods
The findings of this study demonstrate that the controlled application of urea significantly influences shade variation, diffusion behavior, and visual texture on silk fabric dyed with acid dyes. By applying three surface design techniques block printing, screen printing, and hand painting and comparing conventional, spreading, and spraying methods, the experiment revealed how urea treatment alters both color depth and aesthetic characteristics of the printed surface. In the block printing samples, the motifs initially appeared sharp and well defined under the conventional method. However, after urea application, clear diffusion effects were observed. The spreading method created a foggy and blurred appearance, indicating that localized urea concentration promoted dye migration from the printed motif into the surrounding fiber areas. In contrast, the spraying method produced a softer and more visually balanced diffusion. Because the sprayed urea solution distributed moisture more evenly across the fabric surface, dye movement occurred in a more controlled and gradual manner, resulting in a smoother blur effect.
A similar trend was observed in the screen printing samples, although the diffusion behavior differed slightly due to the more uniform paste application typical of screen printing. When the spreading method was used, the printed motifs developed foggy edges accompanied by small white dot effects. These spots may be attributed to uneven urea distribution or localized resist effects caused by moisture concentration. The spraying method, however, produced a more uniform foggy transition around the printed motifs, suggesting that atomized application of the urea solution allowed more consistent dye migration across the textile surface.
Hand painting samples exhibited the most diverse visual responses. In some cases, the spreading method produced white dot effects and color-edge blending, while in others it generated strong color dispersion across the fabric. This variation is likely related to the freehand nature of the painting technique, where dye concentration and brush application vary across the surface. The spraying method allowed colors to blend more smoothly, producing subtle tonal transitions and new aesthetic color variations.
Shade intensity analysis further indicated that the spreading method generally produced slightly darker shades compared to the spraying method. This outcome suggests that higher localized urea concentration enhances dye solubility and retention within the fiber structure, leading to increased color depth. Conversely, spraying distributes the urea solution more broadly, encouraging dye diffusion but slightly reducing color concentration. Overall, the results confirm that controlled urea application can serve as an effective experimental tool for manipulating shade gradation and surface texture in acid-dyed silk textile design.35–37
This study investigated the role of urea in generating shade variation and surface diffusion effects on silk fabric dyed with acid dyes using block printing, screen printing, and hand painting techniques. In block printing, two colors (blue and violet) were applied. Similarly, in screen printing, two colors (magenta and olive) were used. In hand painting, Sample 1 utilized three colors (yellow, magenta, and green; with blue, magenta, and green applied in the spreading method). For Sample 2, five colors (yellow, orange, violet, green, and red) were used. The color tones varied across all printing styles due to differences in application techniques. The results show that urea significantly influences dye diffusion, shade depth, and surface texture of printed motifs. The spreading method produced darker shades due to higher localized urea concentration, which enhanced dye solubility and penetration. In contrast, the spraying method resulted in softer diffusion, lighter shades, and smoother tonal transitions. The response of each printing technique to urea treatment highlights the importance of application method in controlling final design outcomes. In this study different patterns were used to explore and compare the unique visual outcomes of each technique. If identical patterns and colors were used, the comparison could be more standardized and precise. Continuous test printing was conducted, and the results were consistent, indicating reproducibility of the printing process. And this study is more suitable for unique, artistic production due to its experimental nature, though certain controlled aspects may be adapted for small-scale production.
For future research, it is recommended to examine the long-term color fastness and durability of urea-induced effects. Further studies may also explore different fabric types, alternative auxiliaries, and environmentally sustainable substitutes for urea to expand sustainable and creative textile surface design applications.
None.
None.
The author declares no conflict of interest.

©2026 Habib, et al. This is an open access article distributed under the terms of the, which permits unrestricted use, distribution, and build upon your work non-commercially.