Journal of
eISSN: 2373-4345


Case Report Volume 11 Issue 1
1Dental School, Federal University of Pernambuco, Brazil
2COEP Faculty, Brazil
3Department of Prosthodontics and Oral Facial Surgery, Federal University of Pernambuco, Brazil
Correspondence: Fábio Barbosa de Souza, Department of Prosthodontics and Oral Facial Surgery, Federal University of Pernambuco, Av. Prof. Moraes Rego s/n, University City, RecifePE, CEP: 50670-901, Brazil
Received: December 12, 2020 | Published: February 7, 2020
Citation: Menezes GVD, Lucena RPD, Filho AODF, et al. Dentin deflation for recurrent dental discoloration in anterior tooth. J Dent Health Oral Disord Ther. 2020;11(1):18-25. DOI: 10.15406/jdhodt.2020.11.00513
It was described the clinical steps to perform the aesthetic rehabilitation treatment in the anterior region using the dentin deflation technique, associated with tooth whitening and ceramic laminate to solve chromatic alterations in endodontically treated teeth. Patient with chromatic alterations in endodontically treated upper central incisors. For tooth 11, whose enamel was intact, the following was performed: external whitening; palatal access; removal of discolored dentin; intra-root retainer insertion and composite resin restorati
on. In tooth 21, which had unsatisfactory resin veneer, the following was performed: preparation; precision molding; application of ceramic laminate and cementation. The dentin deflation technique, associated with tooth whitening and ceramic laminate application showed aesthetic excellence, proving to be viable options for cases of difficult-to-resolve dental discoloration.
Keywords: tooth discoloration, dentin removal, dental restoration permanent, tooth bleaching, dental veneers
Physical appearance plays an important role in social relations, especially considering the current beauty standards, in which white and aligned teeth are essential for aesthetic of excellence.1 In this sense, in the search for color harmony and, consequently, aesthetic improvement, many treatment alternatives are used in dentistry, among them, tooth whitening, direct and indirect veneers, contact lenses, and the dentin deflation technique.
Essentially, the process of dental discoloration occurs due to the formation of chemically stable structures, long chain compounds of carbon molecules.2 In devitalized teeth, the etiology of discoloration can be attributed to the presence of restorative materials in the crown; bleeding within the pulpal chamber, decomposition of tissue or debris within the pulpal chamber; use of intra-canal drugs and root canal filling materials.3 Among systemic alterations, the following can be mentioned: use of tetracycline during pregnancy and period of pre-eruptive maturation; fluorosis; jaundice; congenital erythropoietic porphyria; imperfect amelogenesis; imperfect dentinogenesis and hyperbilirubinemia,4 and among local alterations, dental trauma, pulp necrosis and pulp calcification stand out.5
Thus, tooth whitening through unstable oxidizing chemical has been a very conservative alternative for aesthetic reconstruction of vital and non-vital discolored teeth.6 In devitalized teeth, only external tooth whitening often does not provide satisfactory results and it is necessary to combine with intra-coronal bleaching techniques.7 It is important to observe that, regarding discoloration, bleaching agents act only on dental structures, and not on aesthetic restorative materials; therefore, there is need to replace aesthetic restorations after tooth whitening. Direct restorations have the advantage of not requiring laboratory steps for work completion. However, clinical success most often depends on the material and restorative technique applied. In addition, professional skill and performance significantly influence the clinical performance of restorations.6
Once constituted in a normal way, the enamel does not change anymore, and the dentin is the only responsible for color alterations. For various reasons, such as patient's age and pulp necrosis, this can be extremely porous. Thus, in 1989, Kennedy proposed an alternative for color recovery by completely removing dentin with a spherical diamond tip and replacing it with lighter restorative materials, a technique called dentin deflation,8 being indicated for cases of discoloration recurrence after endogenous whitening. Moreover, ceramic laminates are excellent treatment alternatives in aesthetic rehabilitation due to their excellent optical properties, wear resistance, biocompatibility, clinical longevity, color stability and predictability of results.9
Given the available therapeutic options, the dentist needs to be aware of indications, limitations and possibilities of each particular situation. Thus, this paper aims to describe, through a case report, the clinical steps to perform the aesthetic rehabilitation treatment in the anterior region using different techniques for the resolution of chromatic alterations for endodontically treated teeth-dentin deflation associated with tooth whitening and ceramic laminate application.
ADF is a 35-year-old male patient attended at the Center of Reception and Emergency Care of the Dentistry School - Federal University of Pernambuco, with complaint of discoloration of the anterior teeth and need for treatment. After anamnesis, intraoral physical examination and radiographic examinations, the presence of chromatic alteration in tooth element 11 was identified, but with an intact crown and, in element 21, the existence of a composite resin surface, whose adaptation, shape and color were unsatisfactory (Figure 1). Both tooth elements had satisfactory endodontic treatments, with element 21 having a prefabricated post. There was history of successive whitening treatments on element 11, both by internal and external techniques, with temporary color reduction and subsequent relapses. Clinical data analysis pointed to treatment plan based on: external whitening; dentin deflation and installation of prefabricated intra-root retainer for element 11 and ceramic laminate for element 21.
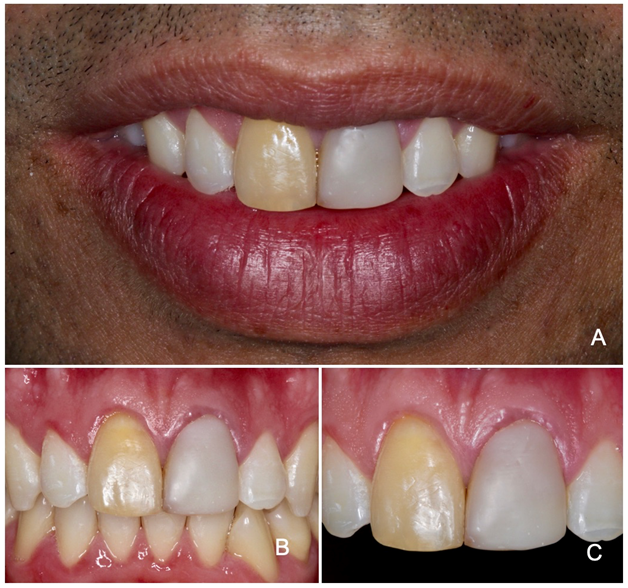
Figure 1 (A) patient’s smile before rehabilitation treatment. (B) Initial aspect, patient in occlusion. (C) Approximate view of elements 11 and 21.
Rehabilitation procedures began with the preparation of element 21 for indirect laminate, which started using a high-speed spherical diamond tip #1014, inclination of 45º to the long axis of the tooth, making the cervical preparation. Then, buccal and incisal wear was performed using 3216 and 2135 tips with pointed end. The neighboring tooth was protected with a steel matrix. Finally, the same drills were used at low rotation to round axial edges (Figure 2A). Subsequently, the region was isolated with KY, being a single increment of composite resin (Filtek 350 XT/3M ESPE-Color A1) directly adapted until the incisor shape was obtained. After photoactivation, finishing with abrasive sand discs (Soflex Pop On-3M ESPE) was performed. Temporary surface cementation was performed using Rely X Temp NE cement (3M ESPE) - Figure 2B.
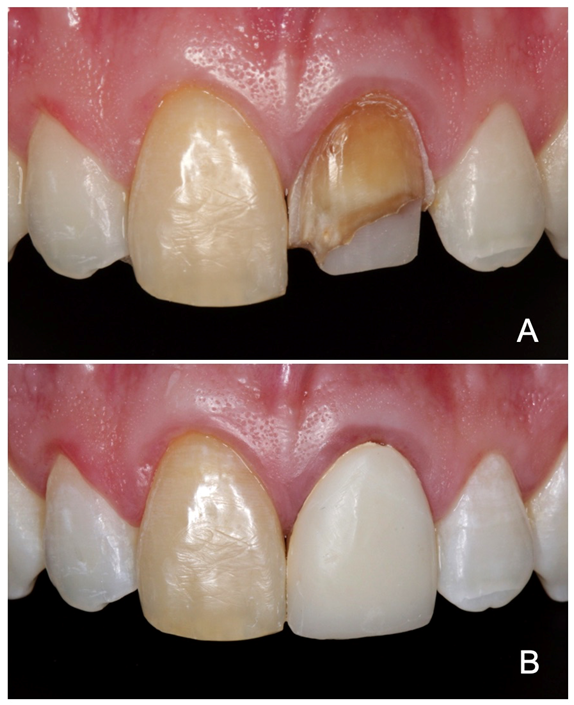
Figure 2 Dental element 21. (A) Preparation for indirect veneer completed. (B) Temporary veneer in composite resin.
With the aim of reducing the dark coloration of element 11, an outpatient external bleaching session was performed on element 11 using 40% Hydrogen Peroxide (OpalescenceBoost/Ultradent) for 40 minutes under relative isolation and gingival barrier (OpalDam/Ultradent) for soft tissue protection (Figure 3), which resulted in superficial coloration reduction.
At the next consultation, access to the coronal chamber of element 11 was initiated by removal of the palatal restoration using spherical diamond tip No. 1015 under relative isolation (Figure 4A). Then, using Largo-type 3 and 4 size drills, compatible with the root canal caliber, partial canal clearance was performed (Figure 4B). About 4 mm of apical sealing was left inside the canal. Then, from the palatal access, the dentin tissue was carefully and progressively removed with the use of spherical diamond tip No. 1016 under high rotation and refrigeration until enamel transparency was visualized (Figure 4C&4D).
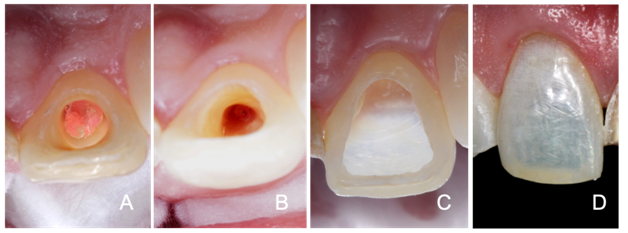
Figure 4 Preparation of element 11. (A) Removal of the palatal restoration and access to the coronal chamber. (B) Partial clearance of the root canal. (C) Palatal view after removal of discolored dentin (emptying). (D) Buccal view after removal of the discolored dentin, showing the enamel transparency.
At this time, fiberglass post was tested (White Post DC/FGM) and radiographic images for visualization. Then, the coronal size was delimited, making the necessary cut with a diamond disk under refrigeration. Post preparation was made with application of 37% phosphoric acid for 15 seconds; washing for the same time; air drying and silane application (Prosil/FGM) for 1 minute. On the coronal and root canal dentin surfaces, the following was performed: drying with air jets and absorbent paper cones; 37% phosphoric acid applied for 15 seconds (Figure 5A&5B); washing for the same time; drying; bonding agent application (Adper™ Single Bond 2/3M ESPE Adhesive) - Figure 5C; excess removal with absorbent paper cone; photoactivation for 20 seconds with LED device (VALO® Cordless/Ultradent), application of resin cement in the root canal (RelyX™ ARC/3M ESPE); post insertion (Figure 5-D); excess removal with the aid of a spatula for composites and photoactivation for 20 seconds.
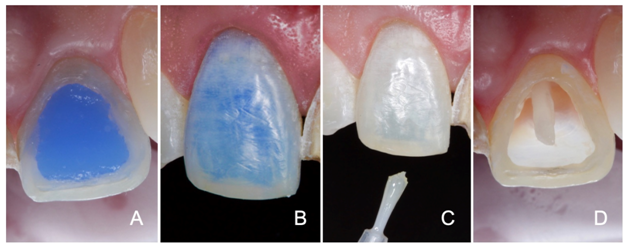
Figure 5 Preparation of element 11 for receiving intra-root post. (A) Palatal view of conditioning with 35% phosphoric acid. (B) Buccal view of the acid conditioning. (C) Bonding agent application. (D) Palatal view of element 11 with fiberglass post in position.
After post cementation, the dentin tissue was replaced by Filtek™ Z350 XT (3M ESPE) composite resin of A1D coloration. The color selection of the composite was performed based on element 12, using the VITA color scale. The composite was inserted with increments of maximum 2mm, followed by photoactivation (Figure 6A‒6 D). Treatment finished with occlusal adjustment, with carbon interposition for the joint in order to identify possible occlusal interference and/or premature contacts. These were removed by means of diamond tips for finishing.
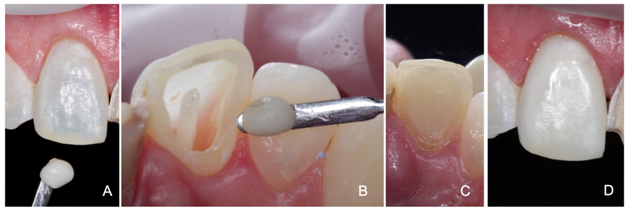
Figure 6 Insertion of composite resin in element 11. (A) Approximate buccal view of the element and composite resin increment of the selected color. (B) Approximate palatal view of the element and increment. (C) Element 11 completed - palatal vision. (D) Buccal view after completion of the incremental technique.
In the following consultation, adequacy/polishing of surfaces of tooth 21 were performed using diamond tips No. 2135 F/FF for finishing and rubber tips for polishing refinement. Number 000 retracting cord (Ultrapak/Ultradent) was introduced into the buccal gingival sulcus of the tooth in combination with astringent paste (3M ESPE) for exposure of the cervical region (Figure 7A). Precision molding was performed with addition silicone (Express™ XT/3M ESPE) using the double-impression technique and PVC plastic film relief (Figure 7B). After the retraction cord was removed, occlusion was recorded with dense silicone paste. In addition, molding of the lower arch was performed. In the same consultation, color was selected based on element 11 (A1), which was submitted to dentin deflation. Then, molds were disinfected and plaster models were built, which were sent to the laboratory to make the ceramic laminate. Provisional veneer was readapted, followed by cementation with RelyXTemp NE (3M ESPE).
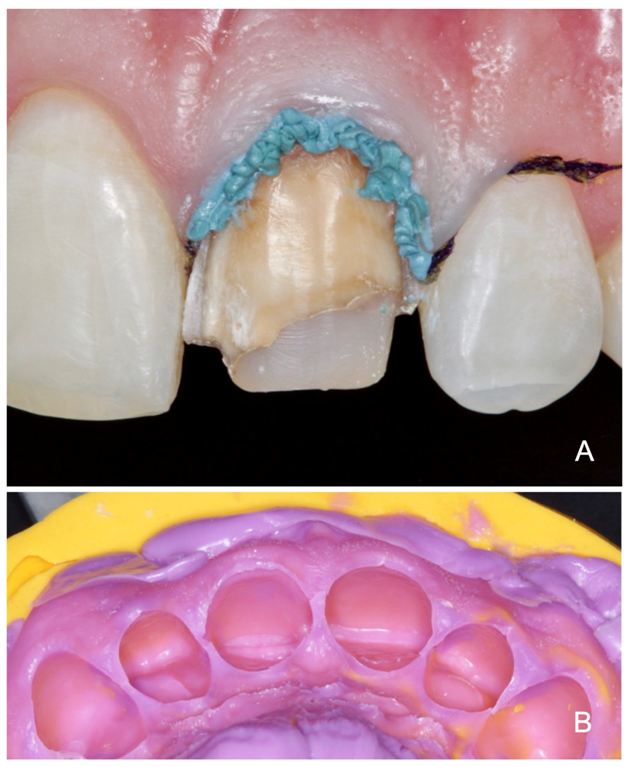
Figure 7 (A) Element 21 with retraction cord insertion in the gingival sulcus, associated with the use of astringent paste; (B) Precision molding with preparation addition silicone to be sent to the laboratory.
At the next appointment, the laminate was fitted to the patient. Initially, the temporary cement was removed using ultrasonic tips, and thus, the laminate was adapted, and its color and shape were completely satisfactory. Under relative isolation with Optragate lip retractor (IvoclarVivadent), Light color test cement (Try-in VariolinkEsthetic LC/IvoclarVivadent) was applied to the laminate, followed by adaptation to the tooth and excess removal (Figure 8). Confirming the color of choice, the laminate was removed and the following was performed: air/water jetting; air jet drying; 5% hydrofluoric acid applied to the inner portion of the laminate for 20 seconds (Figure 9A); abundant washing followed by drying with air jets; bonding agent application (Monobond® Plus/IvoclarVivadent) (Figure 9B), allowing it to react for 60 seconds; strong air jet application.
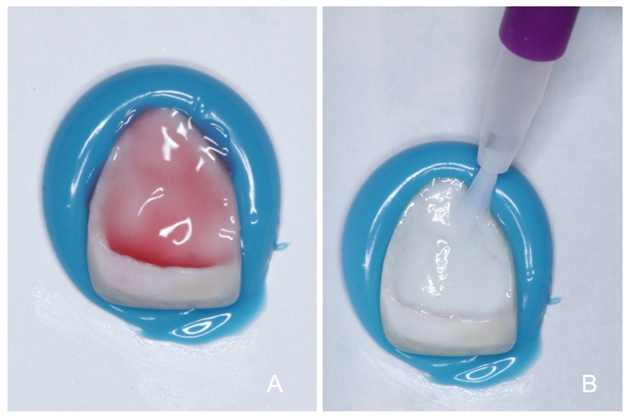
Figure 9 Ceramic laminate preparation. (A) 5% hydrofluoric acid application to the inner portion of the laminate. (B) Bonding agent application.
To start the cementation phase, we opted to isolate the marginal gingiva with the use of retraction cord and protection of adjacent teeth with plastic tape for isolation (Figure 10A). From this point, the following was performed: prophylaxis with pumice paste and water (Figure 10B); conditioning with phosphoric acid for 15 seconds (Figure 10C); air/water jet washing for 15 seconds; drying with cotton pellets; bonding agent application (Adhese Universal/IvoclarVivadent)-Figure 10D, under friction; excess removal with air jets; photoactivation for 20 seconds; cement application (VariolinkEsthetic LC/IvoclarVivadent), with application tip directly on the inner surface of the laminate; veneer adaptation to the tooth (Figure 11A); photoactivation for 2 seconds at a distance of 10mm; excess removal with curette and floss in interproximal regions; covering of the cementation line with air blocker (LiquidStrip/IyoclarVivadent)-Figure 11B; photoactivation for 20 seconds on the buccal and palatal face (Figure 11C); removal of the relative isolation; verification of occlusion/functional movements and patient care guidelines.
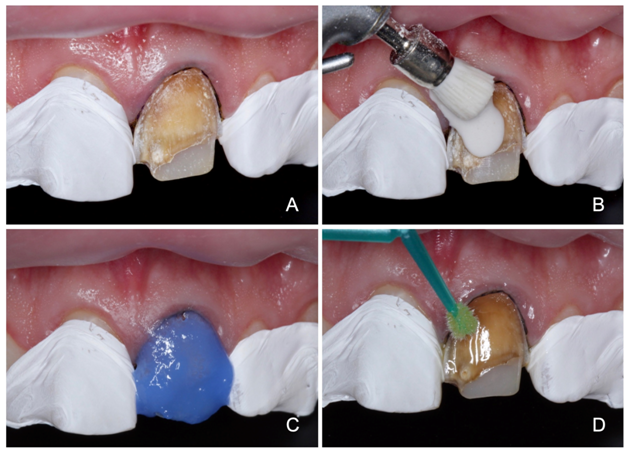
Figure 10 Preparation of tooth 21 for cementation. (A) Retraction cord insertion and protection of adjacent teeth with isolation plastic tape. (B) Prophylaxis with pumice stone and water. (C) Conditioning with 37% phosphoric acid; (D) Bonding agent application.
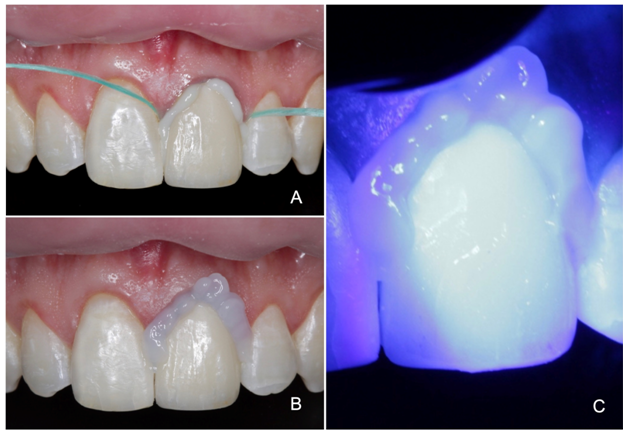
Figure 11 (A) Veneer adaptation to the tooth using cement. (B) After excess removal, covering the cementation line with air blocker. (C) Photoactivation.
The immediate result was quite satisfactory with regard to color, shape and function rehabilitation (Figure 12A), with result maintenance in follow-up consultation after 6 months (Figure 12B).
Rehabilitation of discolored anterior teeth represents a challenge for dentists. The first step to successful treatment is to determine the cause of the color alteration. The etiology of discoloration of devitalized teeth is well known. Among the main causes of this chromatic alteration, the presence of restorative materials in the crown, bleeding inside the pulpal chamber, decomposition of tissues or debris inside the pulpal chamber, use of intracanal drugs and root canal filling materials stand out.6,10 From the anamnesis of the case of this study, it was found that the initial discoloration resulted from dental trauma of tooth,11 whose internal whitening treatment had already been previously performed, with recurrence of pigmentation. In addition, it can also be attributed to the presence of endodontic material inside the coronal chamber with an additional etiological factor (Figure 4A).
One of the limitations of internal whitening of discolored non-vital teeth is the recurrence of the initially color obtained, which is caused by the diffusion of pigmented substances and infiltration of bacteria into spaces between restoration and the dental structure.11,12 In addition, it is believed that the other causes of recurrence of chromatic alteration are the reduction, within dentinal tubules, of whitening compounds, the inherent permeability of dental tissues - enamel and dentin - to extrinsic substances and the restructuring of darker molecules.10,13 Evaluating the esthetic results in 58 pulped teeth from 1 to 8 years after internal whitening, color recurrence was observed in 50% of these teeth.14 Dark yellow discolorations, such as the one in the present case, are those that present higher whitening resistance.15 The greater the difficulty in whitening the dental element, the greater the likelihood of color recurrence.13,16
Essentially, the color of a tooth is determined by the color of the dentin and its extrinsic and intrinsic pigmentation. The chromatic characteristic described as intrinsic is determined by the optical properties of the enamel and dentin and their interaction with light, while an extrinsic characteristic fundamentally depends on the absorption of some material on the enamel surface.17,18 Thus, techniques that could have more long-lasting results, with preservation of the external enamel anatomy (external whitening+dentin deflation) have been selected.
As the aim was to reduce the dark coloration, external whitening on element 11 was performed with a high-concentration product in a single session to obtain faster result, in the office, to remove organic pigments. This was performed before the removal of the discolored dentin so that there was no contamination of the root canal, avoiding possible injuries caused by internal whitening and endodontic re-treatment 19. As a less invasive procedure, tooth whitening should always precede the use of more aggressive techniques in terms of dental structure wear 21. Moreover, it is a simple, low-cost, extremely conservative and efficiency technique with high success rate proven by several studies, being therefore of great indication.11,22‒24
Given the inability to recover the color of element 11, the dentine deflation technique was chosen, since it presents efficient clinical response and the aesthetic result is quite satisfactory. In this technique, maintenance of the buccal face enamel ensures quality, shine and smoothness, providing more naturalness to the rehabilitation technique.25
With a spherical diamond tip, the entire dentin was removed, and its limit was extended to the interior of the root canal, requiring clearance and enlargement. Even so, dentin deflation is considered as a less aggressive elective technique compared to prostheses or single veneers, even considering the risks of fracture during the procedure. The possibility of coronal fracture during dentin deflation poses a risk of failure, but if performed with skill and caution, it may be a good clinical alternative.25‒27 Clearance and enlargement are intended to make reinforcement in the form of tooth, that is, a miniature tooth made of composite resin.25
The use of composite resin rather than glass ionomer was because despite having high biocompatibility and linear thermal expansion coefficient close to the dental structure, composite resin is a very porous material with low tensile and compressive strength. Composite resins are indicated as dentin substitutes for aesthetic or mechanical reasons as they are stronger than glass ionomer to support unsupported enamel.28
The insertion technique used for this case was incremental, ensuring lower polymerization stress. When uncontrolled, polymerization shrinkage is considered to be responsible for the failure of the restoration marginal sealing, interfering with adhesion to the dental structure, producing micro-gaps that facilitate marginal infiltration.29‒32 Perhaps this is the best way to reduce the effects of Factor C, because the union of each increment is to a few walls, providing more areas of free surfaces for flow and stress relief and the smaller amount of material to be contracted.33 Another very important fact of this increment insertion is to prevent cracks to the enamel, which is without dentin support.
The use of nanoparticle resins in this case is justified by the fact that they are tensile, compressive and fracture resistant, equal to or better than universal composite resins and better than microparticulate resins.34 In addition, because their load particles are smaller, approximately 0.02μm, a great gain in its optical properties was obtained, because its diameter is a portion of the visible light wavelength (0.4-0.8μm), not being able to be observed by the human eye, better polishing, easier handling and structural stability.35
In this technique, care must be taken when removing dentin, especially in the incisal region. The enamel “V” on the incisal border should be maintained as it is a tooth reinforcement structure,25 which was performed in this case report.
The association with dental office whitening, as it is a less invasive procedure, is a good association, since it had advantages over the use of more aggressive techniques in terms of dental structure wear on the buccal surface. Dental durability in terms of fracture resistance is equal to any coronal reconstruction with resin material, that is, much of which will depend on the careful patient maintenance in terms of parafunctional habits and chewing care.21,36
In order to retain the restorative material, in addition to the distribution of forces directed along the tooth axis, a prefabricated fiberglass post was installed. This was chosen because it has properties similar to dentin, generating less stress transfer to root structures, reducing the likelihood of fractures.37‒40 Fiberglass posts have properties very similar to dentin, thus absorbing the stresses generated by chewing forces and protecting the root remnant, as they enable the construction of a mechanically homogeneous unit.41 In addition, since it is composed of fiberglass surrounded by resinous material, the post provides refraction and transmission of internal colors through the dental structure, porcelain or resin without the need for the use of opaque or modifiers, and chemically adheres to resins for dental use, requiring no surface treatment,42,43 showing its ease of use.
Regarding dental element 21, whose therapeutic option was indirect veneer, it is important to highlight that teeth treated with veneers functionally behave as natural teeth, regarding deformation and stress transfer.44 In addition, ceramic laminate was chosen due to its favorable properties such as compressive and abrasion resistance, color stability, chemical stability, radiopacity, thermal conductivity, biocompatibility, similarity to dental tissues, biomimicry and marginal integrity.45,46 The advantages of ceramics over composite resin veneers are: fewer stains, resistance to the deleterious effects of alcohol, medications and solvents, and greater adhesion effectiveness.47,48 In this element, the external whitening technique was not performed because the entire element would be covered by a ceramic laminate with color similar to element.11
The relative isolation technique was chosen so that the entire-mouth coloration could be analyzed, checking the smile harmony. The non-use of absolute isolation could be an aspect to be questioned; however, studies have shown that absolute isolation is not decisive for good clinical restorative performance,9,49,50 especially when using lip retractor, suction and retraction cord.
Another peculiarity of the case was the non-use of the polyester matrix, which would also allow better visualization. However, it presents greater thickness, impairing the conformation of the proximal contact and the visualization of the adjacent tooth. Using this tape to restore anterior teeth facilitates visualization of the operative field while protecting the adjacent tooth during acid etching and adhesive application procedures, providing close contact and greater patient satisfaction with the aesthetic result. In addition, the use of this tape is considered simple and inexpensive.51
Regarding the cementation type, the choice of light-activated cements was due to their low solubility, high tensile strength and possibility of selecting the color of the cementing agent, as well as color stability.52 They are mainly indicated in the cementation of ceramic laminate veneers, as they are thin parts, allowing light passage and effective polymerization of the cementing agent.53
Even if all surgical steps are performed with all technical rigors, it is essential to guide the patient on the care that must be taken to maintain the restored dental elements. In this sense, guidelines regarding oral hygiene and non-adoption of parafunctional habits proved to be fundamental to optimize treatment longevity, with satisfactory results, as observed after 6 months of treatment (Figure 12B). Thus, the case preservation guarantees the continuity of treatment success. Scientific evidence, by means of reports published in journals21,26,54 using the dentin deflation technique, has accredit this technique for clinical use. However, it is necessary to carry out randomized clinical trials to analyze the clinical performance of this technique to ensure that it has success and longevity in different types of patients, regardless of dental discoloration causes.
At the end of the case, it was concluded that dentin deflation emerges as another treatment option for recurrent tooth discoloration, provided the buccal face is intact. This technique enables maintaining the brightness and natural appearance of the dental element, which aesthetic result was well accepted by the patient. In addition, ceramic laminate showed very satisfactory results, giving naturalness and harmony to the patient's smile. Difference and improvement in aesthetics was observed by comparing the initial and final aspects (Figure 13A&13B).
None.
The authors thank the patient who participated in the study.
The authors declare that there are no conflicts of interest.

©2020 Menezes, et al. This is an open access article distributed under the terms of the, which permits unrestricted use, distribution, and build upon your work non-commercially.